Quick and Easy Tips & Ideas for Long Exposure Photography at Disney World

Long exposure photography can look and feel intimidating but I’m here to share how I take great shots at Disney Parks on my Iphone.

Long exposure photography is a technique used to create stunning images that capture the essence of motion and time. When it comes to iPhone photography, the long exposure feature can be a powerful tool to create beautiful images of Disney World.

Before & After Long Exposure

Disney World is a magical place full of lights, colors, and movement. With its countless attractions, rides, and shows, there are plenty of opportunities for anyone to capture the essence of magic and wonder. Long exposure photography can help you do just that.

One of the best times to capture long exposure shots at Disney World is during the evening when the park is illuminated with thousands of lights. You can capture the movement of the rides and attractions by using a slow shutter speed, which will create streaks of light and blur the background. This effect will give your photos a sense of motion and energy.

To create long exposure shots on your iPhone, you can use the Live Photos feature. Simply open your camera app, swipe to the left until you see the Live Photos option, and select it. Then, hold your phone steady and press the shutter button to start the exposure. Keep your phone steady until the exposure is complete, and then press the shutter button again to stop the exposure.

Long exposure photography can take some practice, but it is a great way to add an extra dimension of creativity to your Disney World photos. So next time you visit the park, don’t forget to experiment with long exposure photography to capture the magic and wonder of Disney World in a new and exciting way!

Here are a few places that I love to try this out at :

Magic Kingdom

  • Dumbo the Flying Elephant
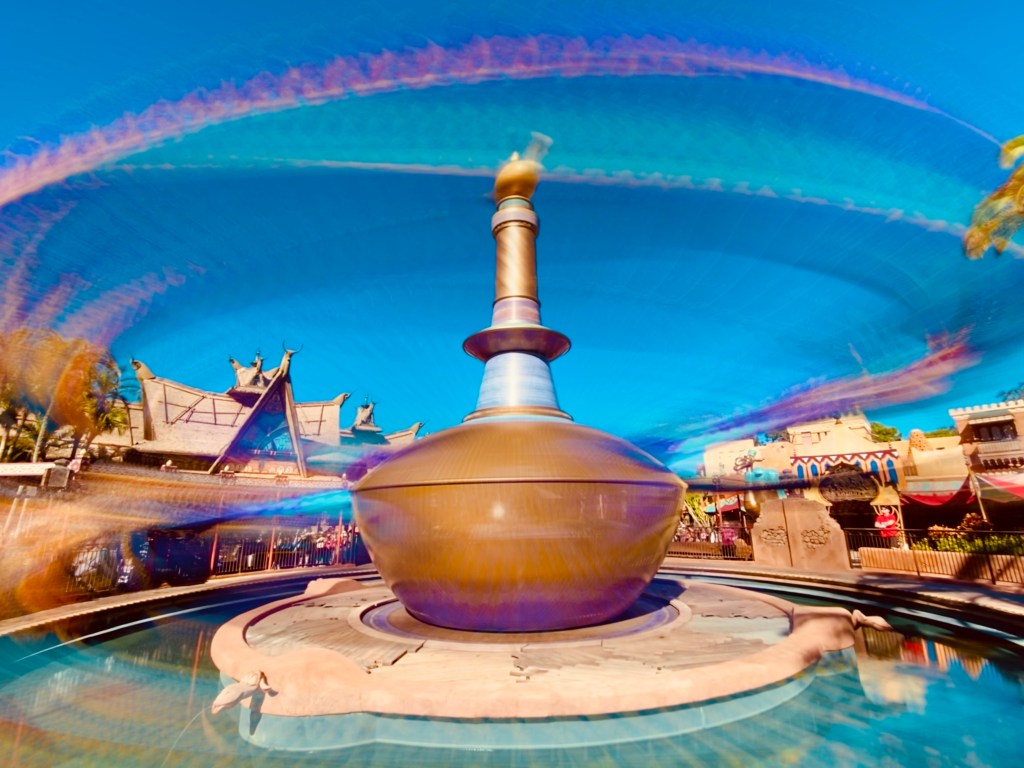
  • The Magic Carpets of Aladdin
  • Astro Orbiter
  • Fireworks

Epcot

  • Monorail & Spaceship Earth at the entrance
  • Monorail & Spaceship Earth near The Land Pavilion
  • Journey of Water

Hollywood Studios

  • Slinky Dog
  • Alien Swirling Saucers

Animal Kingdom

  • Tree of Life water features
  • Tricera Top Spin

Resin Black & Silver Glitter Coaster Tutorial DIY

Here is a quick tutorial on how to make a Black and Silver Resin Coaster or honestly any color of glitter resin coaster.

To start, pick the colors of glitter that you would like to use. We selected a Black and Silver combo and added a bit more silver to the mix.

We use a 1 to 1 Epoxy Resin, which means you will pour equal amounts from Part A bottle and Part B bottle.

Mix your Resin until it appears to be clear.

Add your Glitter and mix away!

We like to spray a little alcohol on our resin molds before we pour the resin. You don’t have to do this, but we find that it helps with bubbles.

Now you can pour the resin into your coaster mold.

After a few minutes, we will spray alcohol again on the resin to help with bubbles.

We typically leave our coasters to dry for 48 hours, but then you can demold and you have a beautiful sparkly coaster!

Here is a short list of items we use for all Resin Projects. Please remember to use the appropriate PPE when working with Resin that includes a mask and gloves.

Supplies

Tools

• Resin

• Plastic or reusable cups

• Spoons

• Glitter

• Resin mold

• Alcohol spray for bubbles

• PPE

Why Sanaa is the Hidden Gem Breakfast at Disney World Resorts

No reservation needed, window seats to the Savanna & a mimosa ?!? What more do you need!

Sanaa’s Grab ‘n’ Go breakfast is that but so much more! Yes, you can grab ‘n’ go, but you can also stay and eat! In fact there is a great menu of hot items you can pick from. Along with a Bloody Mary or Mimosa if you like! Our personal favorites are the Eggs Benedict and the Shahi Tukra French Toast!

Once you order, you get a cute animal 🦒 to take to your table. Since it’s early in the day, you’ll see a lot of animals out on the savanna having breakfast as well!

Technically Sanaa Breakfast is only accessible to those staying at Animal Kingdom Lodge.  However you can take a bus from any park to AKL at anytime.

This is a must do if you are staying at Jambo or Kidani, especially on your resort day! I promise it doesn’t disappoint!

Disney’s Animal Kingdom Up Close With Rhinos Backstage Tour

Disney’s Animal Kingdom Park

Southern White Rhinos, Baby Mylo

Had the best time going on the Up Close With Rhinos tour at Disney’s Animal Kingdom this past week.

The tour is 1 hour long and goes backstage to meet members of the Southern White Rhino care team along with a Rhino!! Disney’s Animal Kingdom currently has 2 Black Rhinos, but these are housed in different areas.

Tickets are $46 with all money going to Disney’s Conservation Fund. There is a discounted ticket price for Annual Passholders. Reservations can currently be made 60 days out from your trip. I encourage looking again if they are not available as more spots do open up!

Check In for Up Close With the Rhinos

Check In is suggested 30 minutes before the 11:00 am tour. It’s located near the entrance of Kilimanjaro Safaris in Africa.

At your time, you hop on a small bus and head to the White Rhino barn. Here you meet the Rhino keepers, who share a lot of fun information. Then you head over to take turns petting a Rhino. The keepers also answer questions, which was awesome! If you a lucky you may also see one of the babies Ranger, Mylo or Logan!

When you get back from the tour, photo ops are offered including a fun photo including which rhino you met.

Photo Op after Up Close With Rhinos tour.

Disney’s Animal Kingdom

Tour Length ⏰ 1 hour

Check In : near Kilimanjaro Safaris

Ticket Price 🎟 : $46 (all to Disney Conservation fund) available 60 days out

Rules : No Cameras backstage

Items we use to make our Photo Coasters

Our small business was designed to provide a place to share our photography but in a very unique way. While we do sell canvas and metal prints along with your regular photos, our #1 seller is the photo coaster! Here is a quick list of all the things we use to make this happen! Don’t worry, we will be back with more step by step instructions!

  • PPE – This is the most important step! Do your research but make sure you have the proper mask along with gloves to be protected!
  • 4×4 ceramic tiles
  • 4×4 photos – these can be printed at a local photo spot. Your phone should have a square crop option or simply size in Instagram
  • Painters Tape – we place this on the back of each tile to help with resin dripping and getting a smooth surface once you pour your resin.
  • Glue Sticks – nothing fancy here, these work the best for us in making sure the photo is attached to the tile.
  • Plastic Cups – we use these for 2 reasons. The first is to pour the resin and mix. Some people use reusable cups, which also work out great! The second reason for cups is to place the coasters on the dry. We flip a cup upside down, lay the coaster on top and work our magic.
  • Plastic Spoons – we use spoons to mix and our our resin
  • Epoxy Resin – there are lots of options out there. We use what we find at Michael’s and apply our coupons which saves a lot when you work with a lot of Resin. Research what you are looking for as there are lots of great options.
  • Straws – these come in handy to blow out bubbles once the resin is poured. We have tried using a heat gun but for us this works the best.
  • Knife – this comes in handy when removing the tape the following day. We typically let our coasters dry for 12 hours and then remove. As the time goes further along it becomes much harder.
  • Cork – we place a cork backing on each of the coasters
  • Hot Glue Gun and Sitcks – we use this for the cork

We think this is a good start. There are lots of ways and tricks for using resin. This is just what has worked for us the best! We love experimenting and trying new things! Check us out and all our resin adventures over on TikTok!

Welcome

Hello and Welcome. We love to travel and take photos of the places we visit. From that our small business was started, creating what we call “usable” art that tell a story of everywhere we have been but also to each person who has an item. We love hearing stories as to why someone may have picked one thing over another and what their connection to that place may be.

We hope to not only share stories of our travels but to also share about our products and a behind the scenes view into our small business.

Clingmans Dome Great Smoky Mountains National Park